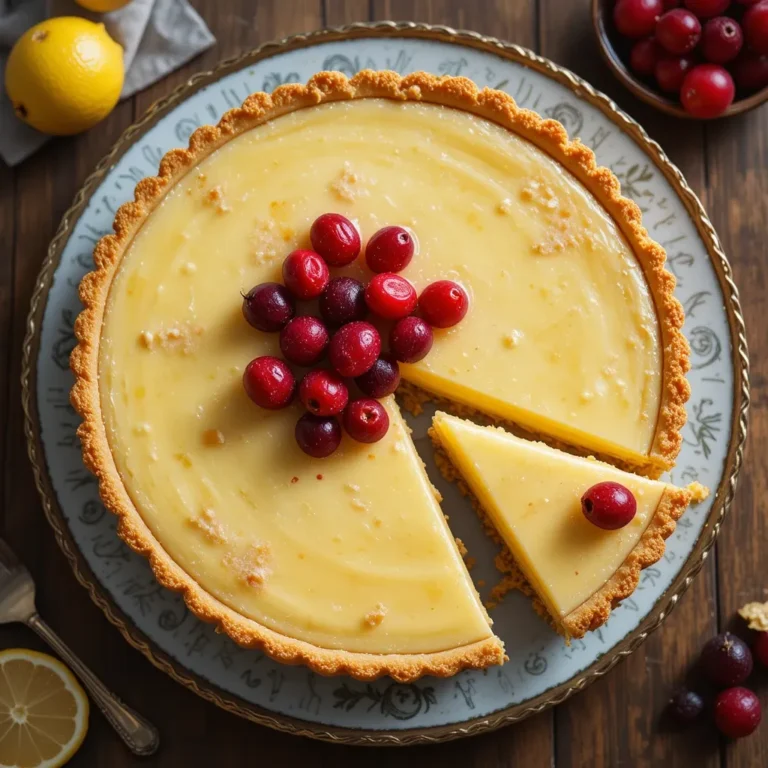
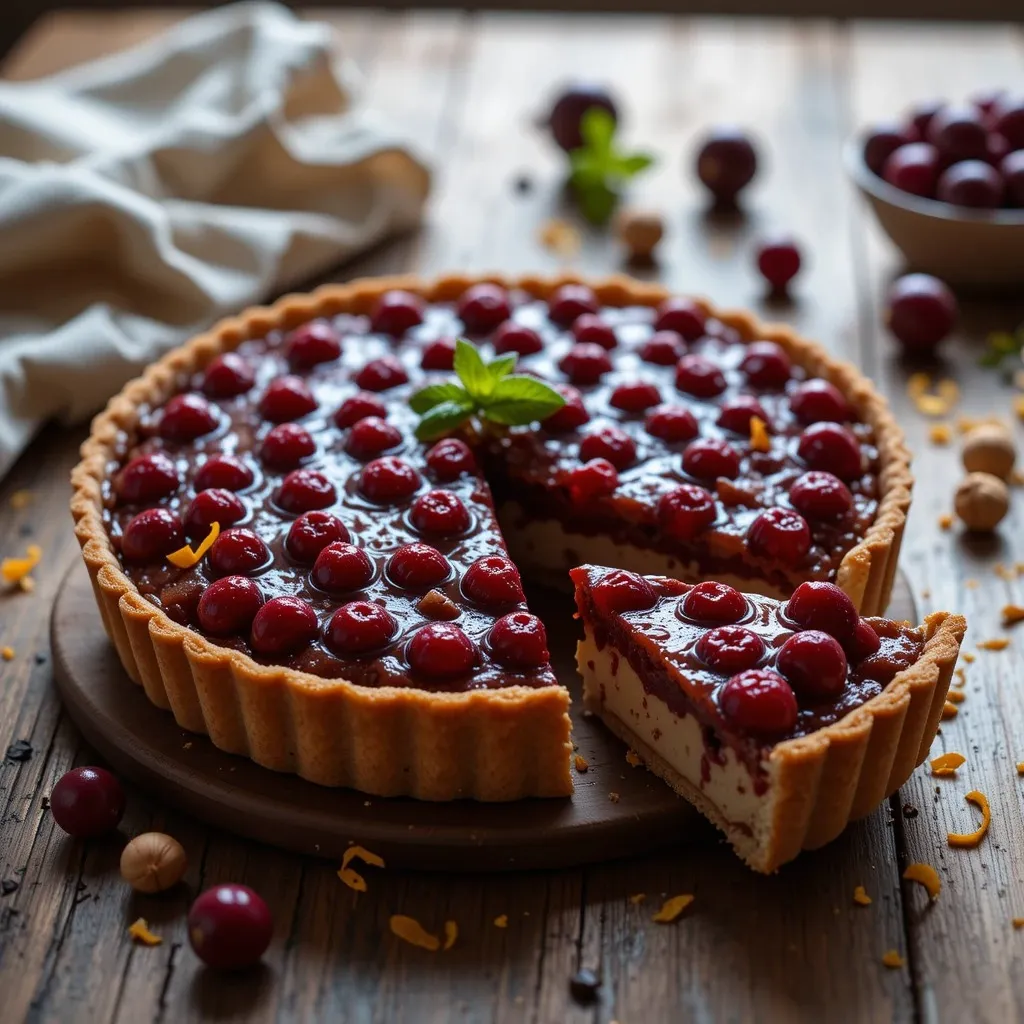
Cranberry Hazelnut Tart Recipe Best Family-Favorite
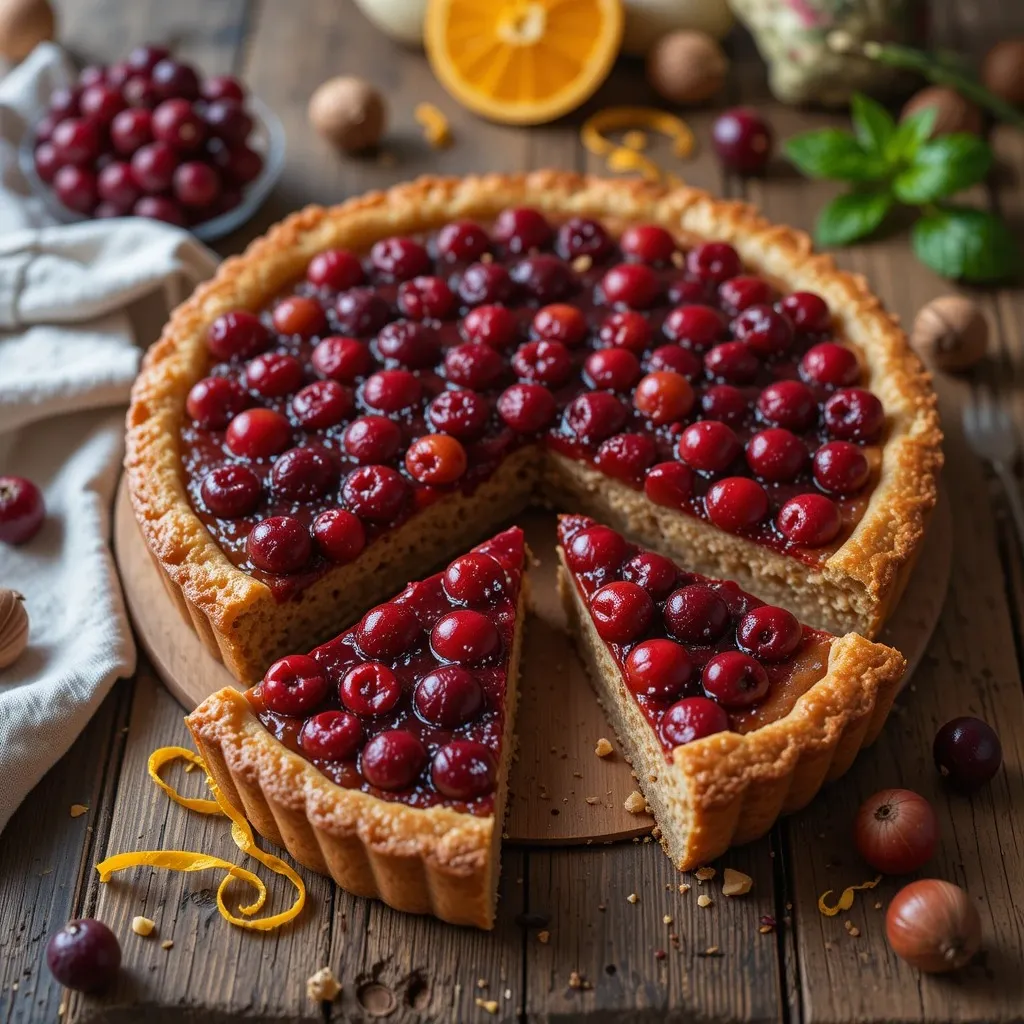
Picture this: golden, buttery pastry cradling a layer of toasted hazelnuts, topped with glossy crimson cranberries that burst with tartness in every bite. That’s exactly what greeted my family last Thanksgiving when I pulled my cranberry hazelnut tart from the oven, and honestly? The silence that followed the first bite told me everything I needed to know. No pumpkin pie that year could compete.
I’ve been making this cranberry hazelnut tart for three years now, and it’s become my secret weapon for holiday gatherings. The first time I attempted it, I was terrified—tarts always seemed so fancy and complicated. But here’s the thing: this recipe is surprisingly forgiving, and the combination of sweet hazelnuts with tart cranberries creates something that tastes like you spent hours in a French patisserie, not your home kitchen on a Wednesday night.
What I love most about this dessert is how it looks just as stunning as it tastes. Those jewel-toned cranberries glisten on top, and when you slice into it, you get these beautiful layers that make people think you’re some kind of baking wizard. Trust me, you don’t need to be. You just need good ingredients and about an hour of your time.
Why This Cranberry Hazelnut Tart Deserves a Spot in Your Recipe Box
Let me tell you why this particular tart recipe has earned a permanent place in my repertoire. I’ve tested this seven times now (yes, seven—my neighbors were very happy with me), tweaking little details until I got it absolutely perfect.
It’s Easier Than You Think
Despite its elegant appearance, this tart doesn’t require any fancy techniques. If you can mix butter and flour, you can make this pastry. I promise. The crust comes together in about ten minutes, and unlike some finicky tart doughs, this one is pretty forgiving if you overwork it slightly. My first attempt was a bit rough around the edges—I definitely overmixed—but it still tasted incredible.
The Flavor Combination Is Unbeatable
Cranberries and hazelnuts are one of those magical pairings that just work. The hazelnuts add this rich, buttery nuttiness that mellows out the sharp tang of fresh cranberries. After testing this multiple times, I found that toasting the hazelnuts for exactly 8 minutes makes the biggest difference in bringing out their flavor. Don’t skip this step!
Perfect for Any Occasion
I’ve served this cranberry hazelnut tart at Thanksgiving, Christmas dinner, random Sunday brunches, and even a spring garden party. It works year-round because while cranberries feel festive and holiday-appropriate, the elegant presentation makes it suitable for any special occasion. My sister requested it for her birthday last year instead of cake.
It Actually Tastes Better the Next Day
Here’s something most recipes won’t tell you: this tart improves overnight. The flavors meld together, the crust softens just slightly, and everything harmonizes. I usually make mine the day before I need it, which also takes the pressure off day-of cooking.
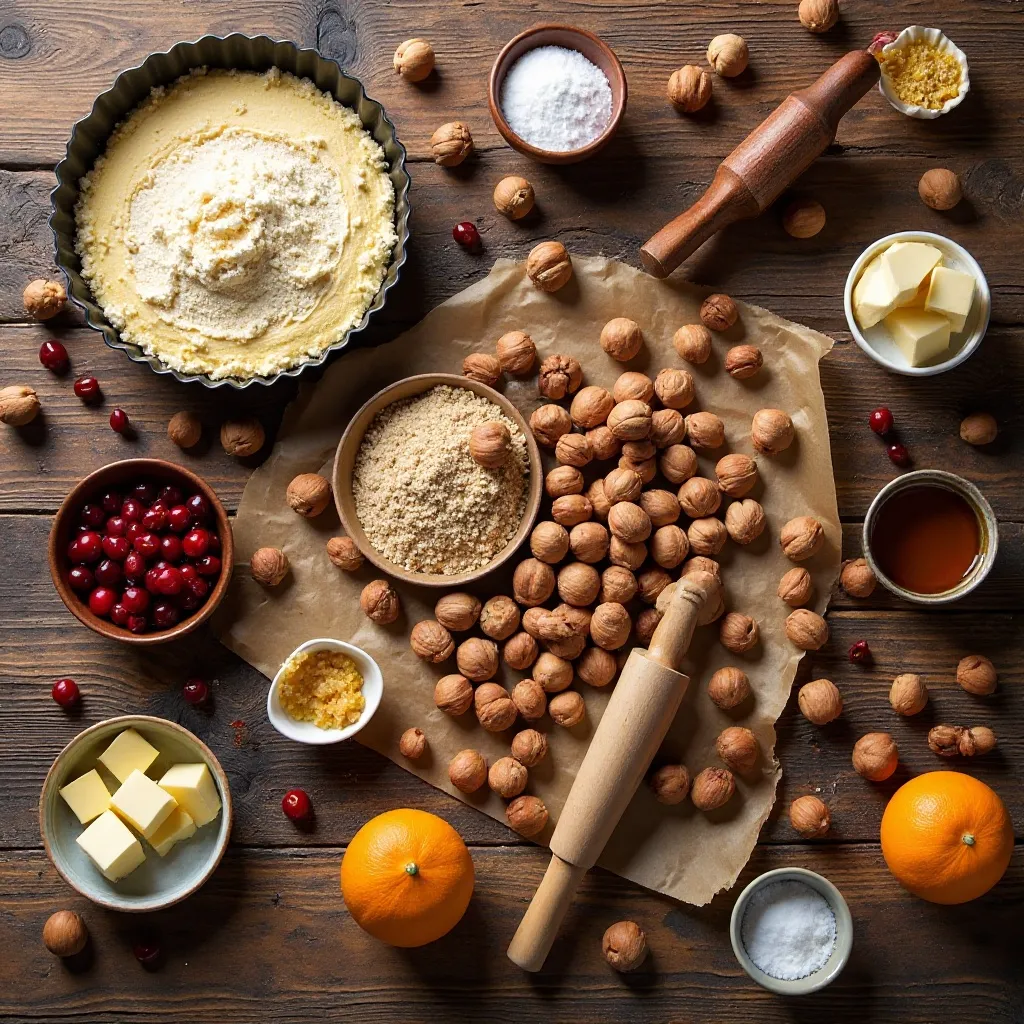
Cranberry Hazelnut Tart Ingredients
Let me walk you through what you’ll need for this beauty. I’ve made this with various substitutions, but the ingredient list I’m sharing is what I’ve found works best after all my testing.
| Recipe Details | |
|---|---|
| Prep Time | 25 minutes |
| Cook Time | 45 minutes |
| Total Time | 70 minutes (plus chilling) |
| Servings | 8-10 servings |
| Difficulty | Medium |
| Calories | 385 per serving |
| Protein | 5g |
| Carbs | 42g |
| Fat | 23g |
For the Tart Crust:
- 1½ cups all-purpose flour
- ½ cup unsalted butter, cold and cubed
- ¼ cup granulated sugar
- 1 large egg yolk
- 2-3 tablespoons ice water
- ¼ teaspoon salt
For the Hazelnut Filling:
- 1 cup hazelnuts, toasted and roughly chopped
- ½ cup unsalted butter, softened
- ½ cup light brown sugar
- 2 large eggs
- 1 teaspoon vanilla extract
- 2 tablespoons all-purpose flour
- Pinch of salt
For the Cranberry Topping:
- 2½ cups fresh cranberries (about 10 oz)
- ¾ cup granulated sugar
- ¼ cup orange juice
- 1 tablespoon orange zest
- 1 teaspoon cornstarch
My ingredient notes: I always use fresh cranberries when I can find them, but frozen works in a pinch—just don’t thaw them first. For the hazelnuts, look for ones that are already blanched (skin removed) to save yourself some work. If you can only find skin-on hazelnuts, toast them, wrap in a kitchen towel, and rub vigorously to remove most of the skins. They don’t need to be perfect; a little skin adds character.
The orange juice and zest in the cranberry layer? Non-negotiable in my opinion. It adds this brightness that cuts through the richness and makes the whole tart sing.
How to Make Cranberry Hazelnut Tart
Alright, let’s get into the actual process. I’ll walk you through this exactly how I make it in my own kitchen, including all the little tricks I’ve learned along the way.
Quick Overview
This tart comes together in three main components: the buttery crust, a rich hazelnut frangipane filling, and a glossy cranberry topping. Total active time is about 30 minutes, though you’ll want to factor in chilling and baking time. Don’t let the multiple steps intimidate you—each one is straightforward, and the end result is absolutely worth it.
Step-by-Step Instructions
Step 1: Prepare the Tart Crust
In a large bowl, combine the flour, sugar, and salt. Add the cold, cubed butter and use your fingers or a pastry cutter to work it into the flour until the mixture resembles coarse breadcrumbs. You’ll know it’s ready when you squeeze a handful and it holds together. Add the egg yolk and 2 tablespoons of ice water, mixing until the dough just comes together. If it’s still too crumbly, add another tablespoon of water. Form into a disk, wrap in plastic, and refrigerate for at least 30 minutes. (Pro tip: I often make this the night before to save time on baking day.)
Step 2: Toast the Hazelnuts
While the dough chills, spread your hazelnuts on a baking sheet and toast them in a 350°F oven for 8-10 minutes until fragrant and lightly golden. My kitchen smells absolutely amazing during this step—like a European bakery. Let them cool completely, then roughly chop them. You want some texture here, not hazelnut dust.
Step 3: Roll and Blind Bake the Crust
Preheat your oven to 375°F. On a lightly floured surface, roll out your chilled dough into a circle about 12 inches in diameter and ¼-inch thick. Carefully transfer it to a 9-inch tart pan with a removable bottom, pressing it into the corners. Trim any excess dough hanging over the edges. Prick the bottom all over with a fork (this prevents bubbling), line with parchment paper, and fill with pie weights or dried beans. Bake for 15 minutes, remove the weights and parchment, and bake another 5 minutes until lightly golden. Let it cool while you prepare the filling.
Step 4: Make the Hazelnut Filling
In a medium bowl, cream together the softened butter and brown sugar until light and fluffy—this takes about 2 minutes with an electric mixer. Beat in the eggs one at a time, then add the vanilla extract. Fold in the flour, salt, and chopped hazelnuts. The mixture should be thick and spreadable. I’ve found that room temperature eggs make a huge difference here; cold eggs can cause the batter to seize up.
Step 5: Assemble and Bake
Spread the hazelnut filling evenly into your pre-baked tart shell. It should come about halfway up the sides. Bake at 350°F for 25-30 minutes until the filling is set and golden brown around the edges. The center should still have a slight jiggle—it’ll firm up as it cools. I once overbaked mine by 10 minutes and it turned out too dry, so watch it carefully after the 25-minute mark.
Step 6: Prepare the Cranberry Topping
While the tart bakes, make your cranberry topping. In a medium saucepan, combine the cranberries, sugar, orange juice, and orange zest. Cook over medium heat, stirring occasionally, until the cranberries begin to pop and break down (about 8-10 minutes). You’ll hear them starting to burst—that’s your cue. Mix the cornstarch with a tablespoon of water to create a slurry, then stir it into the cranberries. Cook for another 2 minutes until the mixture thickens and becomes glossy. Remove from heat and let it cool slightly.
Step 7: Top and Chill
Once your tart has cooled for about 10 minutes, spoon the cranberry mixture evenly over the top. You can arrange it however you like—I usually go for a rustic, slightly messy look, but you can make it as neat as you want. Refrigerate the tart for at least 2 hours before serving. This chilling time lets everything set properly and makes slicing much cleaner.
What to Serve With Cranberry Hazelnut Tart
In my experience, this tart is rich enough to stand on its own, but a few well-chosen accompaniments can really elevate it to something special.
My Go-To Pairing
I almost always serve this with a dollop of barely sweetened whipped cream. The light, airy cream cuts through the richness of the hazelnut filling perfectly. Sometimes I’ll add a splash of Grand Marnier or vanilla to the cream for extra sophistication. Vanilla ice cream works beautifully too—especially when the tart is still slightly warm.
For a Special Occasion
When I’m really trying to impress, I’ll make a quick orange crème anglaise to drizzle around each slice. The orange echoes the flavors in the cranberry topping, and it looks absolutely restaurant-worthy on the plate. A sprig of fresh mint adds a pop of color.
Coffee or Tea?
This pairs wonderfully with a strong French press coffee or a delicate Earl Grey tea. The slight bitterness of coffee complements the sweetness, while tea’s lightness keeps the focus on the tart itself. My mom always requests this with her afternoon tea when she visits.
Pro Tips from My Kitchen
After making this cranberry hazelnut tart seven times and serving it to probably fifty people, I’ve learned a few things that’ll help you nail it on your first try.
Don’t Skip the Blind Baking
I know it seems like an extra step, but blind baking the crust prevents it from getting soggy from the filling. The first time I made this, I skipped it (rookie mistake), and the bottom was undercooked and gummy. Learn from my failures!
Room Temperature Ingredients Matter
For the hazelnut filling, make sure your butter and eggs are at room temperature. I usually set them out about an hour before I start baking. Cold ingredients don’t emulsify properly, and you’ll end up with a grainy filling instead of a smooth one.
Can I Make This Ahead of Time?
Absolutely! This is actually one of those recipes that benefits from being made a day ahead. The flavors develop and meld together overnight, and it makes your day-of schedule so much easier. Store it covered in the refrigerator and bring it to room temperature about 30 minutes before serving.
The Secret to Perfect Cranberries
Don’t overcook the cranberry topping. You want the berries to just burst and release their juices while some remain whole. Overcooking turns them mushy and jam-like, which changes the texture profile of the whole tart. I learned this after ruining a batch—it was still delicious, but the texture was off.
Hazelnut Substitutions
If you can’t find hazelnuts or someone has an allergy, almonds work really well as a substitute. Pecans or walnuts will also work, though they’ll give you a different flavor profile. I’ve tested it with almonds twice, and while it’s not quite the same, it’s still absolutely delicious.
Watch for the Wobble
When checking if your hazelnut filling is done, look for a slight wobble in the center when you gently shake the pan. It should be mostly set but not completely firm. It’ll continue cooking from residual heat as it cools, and you want to avoid overbaking.
Storing and Reheating Tips
Let’s talk about what to do if you somehow have leftovers (though in my house, that rarely happens).
Refrigerator Storage
Store your cranberry hazelnut tart covered in the refrigerator for up to 5 days. I use plastic wrap directly on the surface or keep it in the tart pan with aluminum foil over the top. The crust will soften slightly in the fridge, but honestly, I prefer it that way—it becomes more tender and buttery.
Can You Freeze It?
Yes! This tart freezes surprisingly well for up to 2 months. I recommend freezing it without the cranberry topping if possible, as the berries can get a bit watery when thawed. If it’s already assembled, wrap it tightly in plastic wrap and then aluminum foil. Thaw overnight in the refrigerator before serving.
Best Way to Serve
I prefer serving this tart slightly cool or at room temperature rather than straight from the fridge. The flavors are much more pronounced when it’s not super cold. Take it out about 30 minutes before you plan to serve it.
Recipe FAQs
Can I use frozen cranberries?
Absolutely! Frozen cranberries work great in this recipe. Don’t thaw them first—just toss them into the saucepan frozen and they’ll cook down beautifully. You might need an extra minute or two of cooking time.
What if I don’t have a tart pan?
You can use a 9-inch pie pan in a pinch. The tart won’t be as tall, and you won’t get that beautiful fluted edge, but it’ll taste just as good. I’ve done this when I’ve made it at my in-laws’ house and they didn’t have a tart pan.
How do I know when the hazelnut filling is done?
The edges should be golden brown and slightly puffed, and the center should have just a slight jiggle when you gently shake the pan. If it’s liquid in the middle, give it another 5 minutes. If it’s completely solid and doesn’t move at all, you’ve probably overbaked it slightly (but it’ll still be delicious).
Can I make this nut-free?
For a nut-free version, you could omit the hazelnuts and increase the flour to ⅓ cup in the filling. It becomes more of a custard tart base, which is different but still really lovely with the cranberries on top.
Why is my crust shrinking?
This usually happens if the dough wasn’t chilled long enough before baking or if it was overworked and the gluten developed too much. Make sure to chill it for at least 30 minutes, and handle the dough gently when rolling it out.
Is there a way to make the cranberry layer less tart?
If you prefer things sweeter, increase the sugar in the cranberry mixture to 1 cup. I like the tartness because it balances the sweet hazelnut filling, but everyone’s taste is different. You could also add a tablespoon of honey for a different kind of sweetness.
So there you have it—my tried-and-true cranberry hazelnut tart recipe that never fails to impress. Whether you’re making it for Thanksgiving, a dinner party, or just because you want something special on a random Tuesday, this tart delivers. The combination of buttery crust, rich hazelnuts, and bright cranberries is just perfection on a plate.
I’d love to hear how yours turns out! Do you stick with the classic version, or do you add your own twist? Drop a comment below and let me know, and if you make this, definitely tag me on social media—I love seeing your beautiful creations.
Now get in that kitchen and start baking. Trust me, your kitchen is about to smell amazing